Proof of Mastery in Monster Hunter Outlanders is your adventurer growth goal. Each stage you reach boosts the Attack of every adventurer in your party and unlocks perks such as more damage and meal discounts. This guide covers how to raise it fast with Mastery Points, what each rank gives, and the rewards for every stage. Information as of November 6, 2026.
What Is Proof of Mastery?
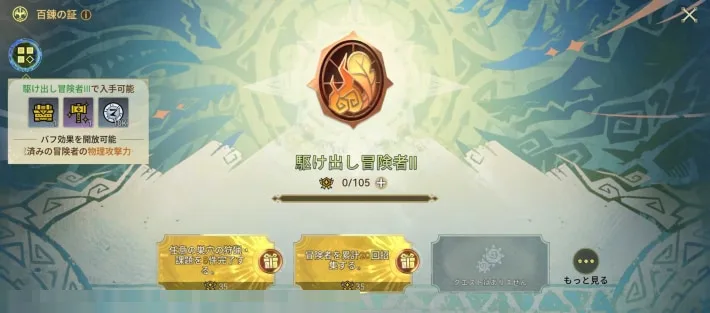
Proof of Mastery has 10 ranks, from Rookie Adventurer to Storm Beyond the Mountains, and each rank has stages I to IV. Early on, raising it is a required step to move the story forward, so it is worth raising on purpose.
Raised by clearing Mastery Point quests
You raise Proof of Mastery by clearing quests that award Mastery Points. Pick these quests on purpose and it goes up much faster.
Needed to raise your Ecological Rank
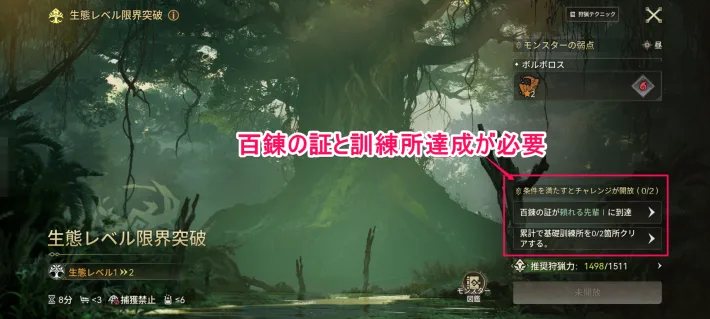
Each Ascension Challenge for your Ecological Rank asks for a set Proof of Mastery rank, such as Reliable Senior. Raise it ahead of time and you won't have to stop and grind each time.
Benefits of Raising Proof of Mastery
Permanent Attack boosts for your adventurers
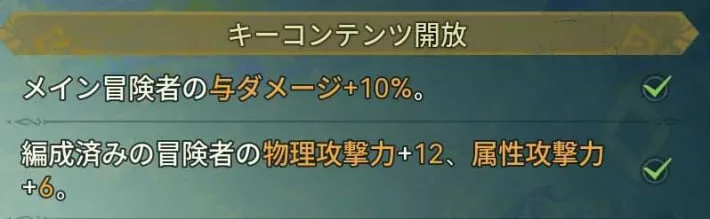
Every stage raises the Attack and Element Attack of the adventurers in your party, up to Attack +240 and Element Attack +120. Some stages also add perks such as Main Adventurer damage +10% and a faster Ultimate, so hunts get easier as you go.
Master of a Hundred Battles: one fewer visage needed for a Set Effect
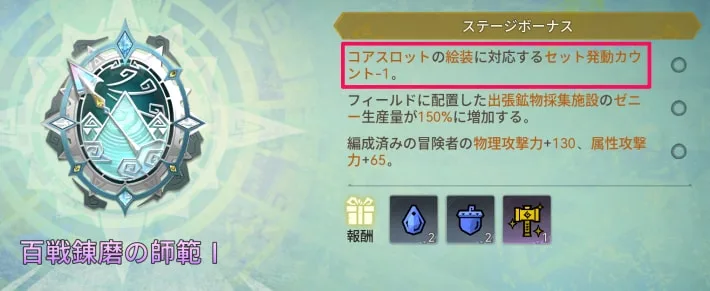
At Master of a Hundred Battles I, the visage in your core slot needs one fewer piece to trigger its Set Effect. In practice you can trigger Set Effects with 6 slots' worth of visages, which makes it easier to fit in one more Set Effect.
Discounted and free meals at the Canteen
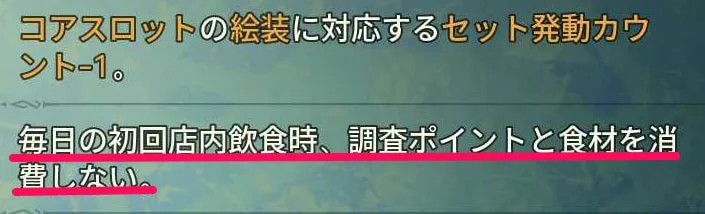
From Seasoned Explorer I, your first Dine In meal each day at the Canteen costs half the Research Points. From Grandmaster of the Guiding Star I, that first meal uses no Research Points or ingredients at all, so you can save Research Points every day.
More Zenny from Ore Gatherers
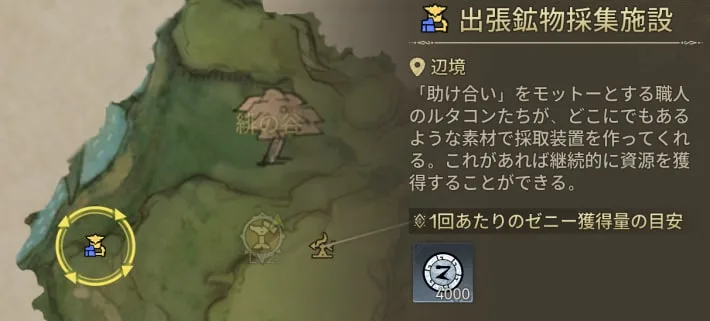
From Battle-Tested Expert, the Ore Gatherers on the field produce more Zenny (150% at Master of a Hundred Battles I). At Storm Beyond the Mountains, it goes up to 300%, so raise your Proof of Mastery early if you want to farm Zenny efficiently.
How to Raise Proof of Mastery Fast
These are the best ways to earn Mastery Points:
- Clear quests as you play the story
- Clear the extra quests that open at Reliable Senior
- Keep up with Monster Challenge and Free Hunt
- Earn more through repeat hunting, upgrading and exploring
Clear quests as you play the story

Many Mastery Point quests are completed just by playing the story. Early on there are lots of quests aimed at raising Proof of Mastery, so it goes up efficiently alongside your story progress.
Clear the extra quests that open at Reliable Senior
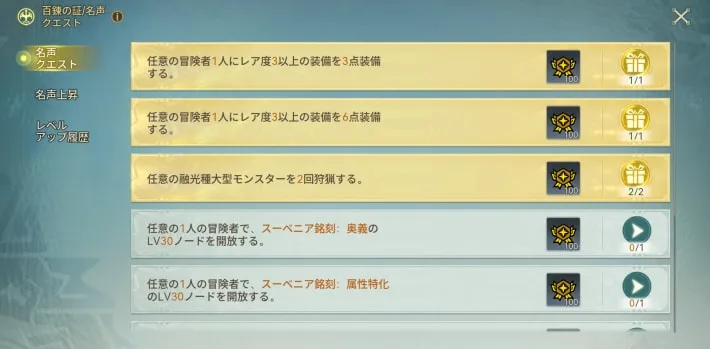
At Reliable Senior, several Mastery Point quests open at once. They include goals such as upgrading adventurers and Buddies and upgrading gear, so check them separately from the story. To see the full list, open Proof of Mastery and press the More button at the bottom right.
Keep up with Monster Challenge and Free Hunt
Mastery Point quests also include Monster Challenge attempts and Free Hunt hunts, so clear them regularly. Some Free Hunt quests must be cleared with different adventurers, so raise several adventurers and prepare their gear.
Earn more through repeat hunting, upgrading and exploring
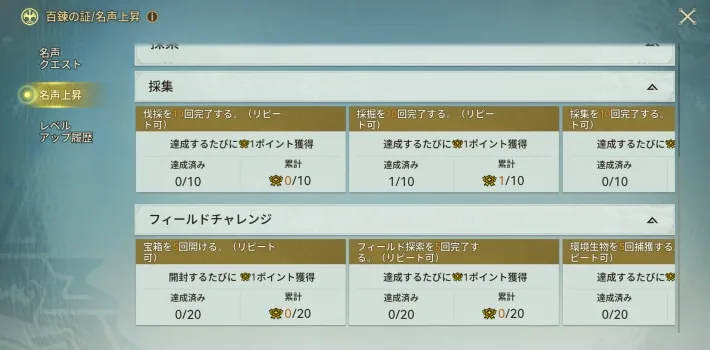
Mastery Point quests also have a repeatable tab for small boosts. Each task gives only a little, but you can earn Mastery Points from details such as breaking monster parts, upgrading Buddies and gathering. Exploration in particular is easy to miss while playing the story, so check it and finish what you can.
Rewards and Bonuses for Each Stage
Perks unlock at these stages, and each one stays active at every later stage:
- Fledgling Adventurer I: Main Adventurer damage +10%
- Reliable Senior I: Free Hunt: party Ultimate gauge charged by 10
- Seasoned Explorer I: First Dine In meal each day costs 50% fewer Research Points
- Established Pioneer I: Buddy Ultimate ready right after you hunt a large monster
- Battle-Tested Expert I: Ultimate cooldown -10% for all adventurers
- Master of a Hundred Battles I: Core-slot visage needs 1 fewer piece for its Set Effect
- Grandmaster of the Guiding Star I: First Dine In meal each day uses no Research Points or ingredients
- Legendary Traveler I: Free Hunt: party Ultimate gauge charged by 20
- Storm Beyond the Mountains I: Main Adventurer damage +20%
- Ore Gatherer Zenny increase (from Battle-Tested Expert, up to 300% at Storm Beyond the Mountains)
The table shows the total Attack and Element Attack bonus for the adventurers in your party, the perk added at that stage, and the rewards for reaching it.
| Stage | Attack / Element | New perk | Rewards |
|---|---|---|---|
| Rookie Adventurer II | +2 / +1 | - | Clear Amber ×1 Invention Point ×1 |
| Rookie Adventurer III | +4 / +2 | - | Tasty Acorn ×1 Invention Point ×1 |
| Rookie Adventurer IV | +6 / +3 | - | Clear Amber ×1 Tasty Acorn ×1 Invention Point ×1 |
| Fledgling Adventurer I | +9 / +4 | Main Adventurer damage +10% | Clear Amber ×1 Tasty Acorn ×1 Invention Point ×1 |
| Fledgling Adventurer II | +12 / +6 | - | Clear Amber ×1 Tasty Acorn ×1 Invention Point ×1 |
| Fledgling Adventurer III | +18 / +9 | - | Clear Amber ×1 Tasty Acorn ×1 Invention Point ×1 |
| Fledgling Adventurer IV | +22 / +11 | - | Clear Amber ×1 Tasty Acorn ×1 Invention Point ×1 |
| Reliable Senior I | +26 / +13 | Free Hunt: party Ultimate gauge charged by 10 | Clear Amber ×1 Tasty Acorn ×1 Invention Point ×1 |
| Reliable Senior II | +30 / +15 | - | Clear Amber ×1 Tasty Acorn ×1 Invention Point ×1 |
| Reliable Senior III | +36 / +18 | - | Clear Amber ×1 Tasty Acorn ×1 Invention Point ×1 |
| Reliable Senior IV | +42 / +21 | - | Clear Amber ×1 Tasty Acorn ×1 Invention Point ×1 |
| Seasoned Explorer I | +48 / +24 | First Dine In meal each day costs 50% fewer Research Points | Clear Amber ×2 Tasty Acorn ×2 Invention Point ×1 |
| Seasoned Explorer II | +52 / +26 | - | Clear Amber ×2 Tasty Acorn ×2 Invention Point ×1 |
| Seasoned Explorer III | +60 / +30 | - | Clear Amber ×2 Tasty Acorn ×2 Invention Point ×1 |
| Seasoned Explorer IV | +65 / +32 | - | Clear Amber ×2 Tasty Acorn ×2 Invention Point ×1 |
| Established Pioneer I | +70 / +35 | Buddy Ultimate ready right after you hunt a large monster | Gleam Amber ×2 Premium Acorn ×2 Invention Point ×1 |
| Established Pioneer II | +78 / +39 | - | Gleam Amber ×2 Premium Acorn ×2 Invention Point ×1 |
| Established Pioneer III | +85 / +42 | - | Gleam Amber ×2 Premium Acorn ×2 Invention Point ×1 |
| Established Pioneer IV | +92 / +46 | - | Gleam Amber ×2 Premium Acorn ×2 Invention Point ×1 |
| Battle-Tested Expert I | +100 / +50 | Ultimate cooldown -10% for all adventurers | Gleam Amber ×2 Premium Acorn ×2 Invention Point ×1 |
| Battle-Tested Expert II | +107 / +55 | - | Gleam Amber ×2 Premium Acorn ×2 Invention Point ×1 |
| Battle-Tested Expert III | +115 / +58 | - | Gleam Amber ×2 Premium Acorn ×2 Invention Point ×1 |
| Battle-Tested Expert IV | +122 / +61 | - | Gleam Amber ×2 Premium Acorn ×2 Invention Point ×1 |
| Master of a Hundred Battles I | +130 / +65 | Core-slot visage needs 1 fewer piece for its Set Effect | Gleam Amber ×2 Premium Acorn ×2 Invention Point ×1 |
| Master of a Hundred Battles II | +140 / +70 | - | Gleam Amber ×2 Premium Acorn ×2 Invention Point ×1 |
| Master of a Hundred Battles III | +148 / +74 | - | Gleam Amber ×2 Premium Acorn ×2 Invention Point ×1 |
| Master of a Hundred Battles IV | +156 / +78 | - | Gleam Amber ×2 Premium Acorn ×2 Invention Point ×1 |
| Grandmaster of the Guiding Star I | +165 / +82 | First Dine In meal each day uses no Research Points or ingredients | Gleam Amber ×2 Premium Acorn ×2 Invention Point ×2 |
| Grandmaster of the Guiding Star II | +175 / +88 | - | Gleam Amber ×2 Premium Acorn ×2 Invention Point ×2 |
| Grandmaster of the Guiding Star III | +182 / +91 | - | Gleam Amber ×2 Premium Acorn ×2 Invention Point ×2 |
| Grandmaster of the Guiding Star IV | +192 / +96 | - | Gleam Amber ×2 Premium Acorn ×2 Invention Point ×2 |
| Legendary Traveler I | +192 / +96 | Free Hunt: party Ultimate gauge charged by 20 | Gleam Amber ×2 Premium Acorn ×2 Invention Point ×2 |
| Legendary Traveler II | +210 / +105 | - | Gleam Amber ×2 Premium Acorn ×2 Invention Point ×2 |
| Legendary Traveler III | +220 / +110 | - | Gleam Amber ×2 Premium Acorn ×2 Invention Point ×2 |
| Legendary Traveler IV | +230 / +115 | - | Gleam Amber ×2 Premium Acorn ×2 Invention Point ×2 |
| Storm Beyond the Mountains I | +240 / +120 | Main Adventurer damage +20% | Gleam Amber ×2 Premium Acorn ×2 Invention Point ×5 |
Where to Check Your Proof of Mastery
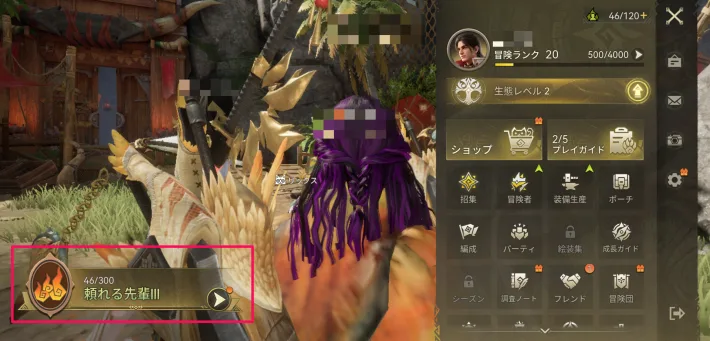
Open the menu to see your current Proof of Mastery at the bottom left. Tap it to see the next rank and the Mastery Point quests you still have to clear.
In villages and lobbies, your current rank also appears as an icon above your character.
The screenshots are from the Japanese version of the game.